Tools: Generating Web Images from PDF (Poppler + ImageMagick)
Convert PDF to PNG using Poppler (pdftoppm) and process the image with ImageMagick to generate blog-ready web images.
In this post, I describe a two-step process for generating web images from PDF files used on the blog.
The goal is to obtain a consistent and visually clean preview of a selected PDF page in the form of a PNG image optimized for web publication.
The final output has the following characteristics:
- fixed width: 620px\
- white margin (paper-like effect)\
- thin outer border\
- soft drop shadow\
- compression adjusted for online publishing
The process consists of two stages: converting PDF to PNG using pdftoppm (Poppler), followed by further image processing (styling) in ImageMagick.
Example Output
Processing sequence: PDF → PNG (raw) → PNG (web)
PDF file: example-en.pdf
PNG file (raw): example-en-raw.png
PNG file (web): example-en-web.png
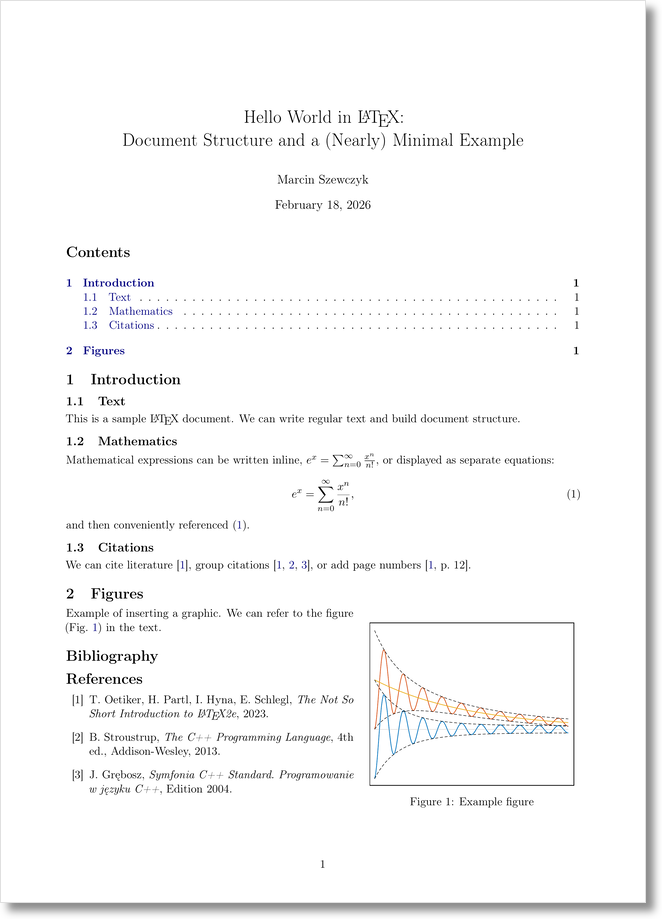
Fig. 1. Example image generated from the document example-en.pdf.
Environment
Working environment: MSYS2 MinGW64.
Installing Poppler (pdftoppm)
The pdftoppm program is part of the Poppler package – a PDF rendering library based on the Xpdf engine.
Installation:
1
pacman -S mingw-w64-x86_64-poppler
Verification:
1
pdftoppm -v
Installing ImageMagick
Installation:
1
pacman -S mingw-w64-x86_64-imagemagick
Verification:
1
magick -version
Step 1: Converting PDF to PNG (Poppler)
The first stage converts a selected (here: the first) page of a PDF document into a high-resolution PNG image:
1
pdftoppm -png -r 300 -f 1 -singlefile example.pdf example-raw
This produces:
1
example-raw.png
Parameters:
-r 300— high rendering quality\-f 1— first page\-singlefile— single output file
At this stage, the image is technically clean – without any styling applied.
Step 2: Styling the PNG for Web Use (ImageMagick)
The second stage transforms the image into a publication-ready version:
1
magick example-raw.png   -resize 620x   -bordercolor white -border 12   -bordercolor "#e0e0e0" -border 1   -alpha set   \( +clone -background black -shadow 45x4+0+3 \)   +swap -background none -compose over -composite   -strip -quality 92   example-web.png
This produces:
1
example-web.png
Rationale Behind the Parameters
300 DPI during conversion
Ensures sharp text after subsequent scaling.Resizing only in ImageMagick
Allows precise control over the final width.White margin before gray border
The gray line functions as a subtle outer outline.Shadow generated after adding the border
The visual result resembles a sheet of paper floating above the background.-strip -quality 92
Reduces file size while preserving visual quality.
Automation (MSYS2 MinGW64)
Below is a simple Bash script executed within MSYS2 MinGW64.
Script download: pdf-to-web-image.sh
1
2
3
4
5
6
7
8
9
10
11
12
13
#!/usr/bin/env bash
set -e

pdf="$1"
[ -n "$pdf" ] || { echo "Usage: ./pdf-to-web-image.sh example.pdf"; exit 1; }

base="$(basename "$pdf" .pdf)"

pdftoppm -png -r 300 -f 1 -singlefile "$pdf" "${base}-raw"

magick "${base}-raw.png"   -resize 620x   -bordercolor white -border 12   -bordercolor "#e0e0e0" -border 1   -alpha set   \( +clone -background black -shadow 45x4+0+3 \)   +swap -background none -compose over -composite   -strip -quality 92   "${base}-web.png"

echo "OK: ${base}-web.png"
Grant execution permission:
1
chmod +x pdf-to-web-image.sh
Usage:
1
./pdf-to-web-image.sh example.pdf
The script takes a PDF file as an argument and generates:
*-raw.png*-web.png
Summary
This simple tool generates clean, web-optimized images from PDF files.
It ensures layout consistency and enables automation within the publishing workflow.