Environment: Jekyll – Toolchain Configuration (VS Code, Git, SSH, Ruby)
Configuration of a local development environment for a Jekyll blog: Git, SSH, Ruby (DevKit) and local build workflow.
This post documents the configuration of a development environment for a Jekyll-based blog hosted on GitHub Pages.
1. Visual Studio Code
Visual Studio Code (VS Code, VSC) is used as the primary editor.
It serves both as a source editor (Markdown, YAML, HTML, CSS) and as an integrated terminal.
Installation: https://code.visualstudio.com/
2. Git
Git is a distributed version control system (SCM – Source Code Management).
It enables change tracking, branching, and synchronization of repositories with GitHub.
Installation: https://git-scm.com/
During installation the following options were selected:
- ✔ Use Visual Studio Code as Git’s default editor
- ✔ Override the default branch name: main
- ✔ Git from the command line and also from 3rd-party software
- ✔ Use bundled OpenSSH
Global identity configuration:
1
2
git config --global user.name "Your Name"
git config --global user.email "your_github_email@gmail.com"
Verification:
1
git config --global --list
Repository access is performed via SSH (alternatively HTTPS with a personal access token may be used).
3. SSH Configuration for GitHub
Key Generation
A cryptographic key pair is generated to authenticate GitHub connections without using a password:
1
ssh-keygen -t ed25519 -C "your_github_email@gmail.com"
Displaying the public key:
1
type %USERPROFILE%\.ssh\id_ed25519.pub
where %USERPROFILE% denotes the current user’s home directory, containing the .ssh folder with SSH keys.
Adding the Key to GitHub
- GitHub → Settings
- SSH and GPG keys
- New SSH key
- Title (e.g.,
Lenovo-X250-2026) - Paste the key
- Add SSH key
Connection test:
1
ssh -T git@github.com
Expected result:
1
Hi your-username! You've successfully authenticated, but GitHub does not provide shell access.
4. Ruby (required by Jekyll)
Jekyll is a static site generator written in Ruby.
Therefore, running the blog locally requires an installed Ruby interpreter and package manager.
By the way, Ruby was created with the idea of “programmer happiness” (Y. Matsumoto)1.
Installation: https://rubyinstaller.org/
Selected version: Ruby+Devkit 3.3.x
After installation:
1
ridk install
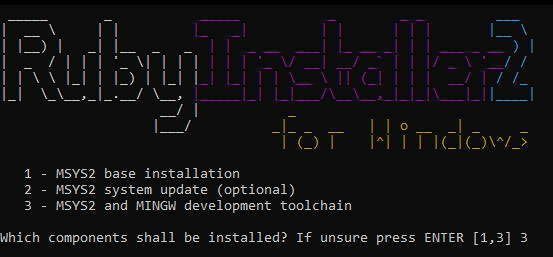 Rys. 1. Ruby installer for Windows.
The ridk install command installs MSYS2 and the required toolchain (gcc, make), necessary to compile gems with native extensions.
Verification:
1
ruby -v
5. Installing Project Dependencies
The installation is performed separately for each repository:
1
2
3
4
5
6
7
cd "C:/Git/repositories/blog-pl"
gem install bundler
bundle install

cd "../blog-en"
gem install bundler
bundle install
This installs:
- Bundler
- all gems listed in the
Gemfile - including Jekyll and the active theme (e.g., Chirpy)
In Ruby, packages (libraries) are distributed as gems.
6. Local Execution
For blog-pl:
1
bundle exec jekyll s
The default Jekyll port is 4000.
Preview: http://127.0.0.1:4000/
For blog-en (alternative port):
1
bundle exec jekyll s -P 4001
Preview: http://127.0.0.1:4001/.
This launches local Jekyll development servers.
Summary
Configuration result:
- VS Code installed
- Git installed and connected to GitHub via SSH
- Repositories synchronized
- Ruby + DevKit compiling dependencies
- Jekyll running locally on ports 4000 and 4001
Build → works → done. It’s cool.
Y. Matsumoto, The Philosophy of Ruby, Artima Developer, 2003.
https://www.artima.com/articles/the-philosophy-of-ruby“For me the purpose of life is partly to have joy. Programmers often feel joy when they can concentrate on the creative side of programming. So Ruby is designed to make programmers happy.” ↩︎